
Custom fields provide a powerful way to tailor your invoicing system according to your specific business needs. With this feature, you can add additional data fields beyond the standard ones, ensuring more personalized and detailed record-keeping.
What Are Custom Fields in KhataBuddy?
Custom fields in KhataBuddy allow users to add personalized data fields to their invoices, quotations, and other financial documents. This feature enables businesses to capture specific details that are not included in standard invoice templates, ensuring better customization and flexibility.
For example, users can create custom fields for Sales Invoices, Quotations, Purchase Orders, or Payments — helping them include necessary details directly on invoices. These fields can be of different types, such as text, numbers, dropdowns, or dates, making them adaptable to various business needs.
Steps to Add Custom Fields
Follow these steps to add custom fields in KhataBuddy:
Step 1: Log in to Your Account
- Sign in to your KhataBuddy account to access the dashboard.
Step 2: Navigate to Settings & Select Custom Fields
- Go to the Settings section and select Custom Fields from the menu.
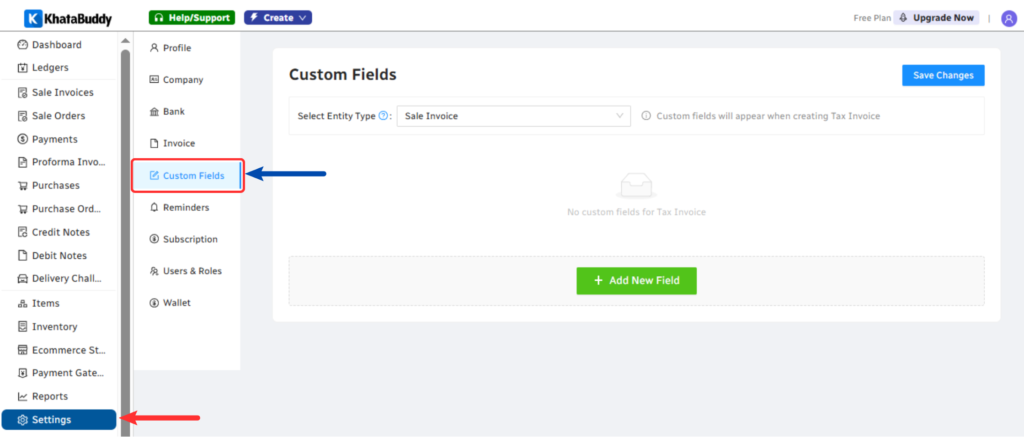
Step 3: Select Entity Type
- Choose the entity type (e.g., Sales Invoice, Quotation, or Receipt) for which you want to create custom fields.


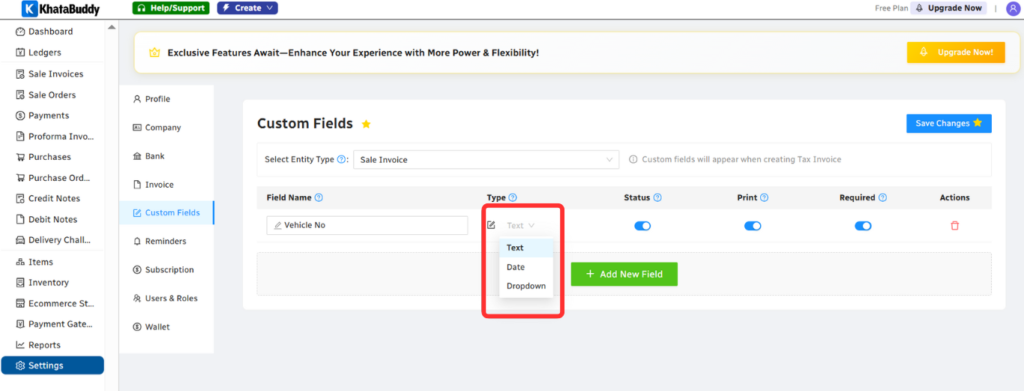
Step 4: Click on “Add New Field” to Create Fields
- Press the Add New Field button to start setting up a new field. This allows you to define custom attributes tailored to your business needs.

Step 5: Enter Field Name
- Enter a unique and descriptive name for the new field. This helps in easy identification and ensures clarity in data management.

Step 6: Choose Field Type
In this step, you can select the appropriate field type to capture specific details in invoices. Available options include:
- Text Field – Used for entering words, phrases, or short descriptions.
- Example: Purchase Order No, Vehicle No
- Date Field – Enables date selection for records.
- Example: Delivery Date or Purchase Order Date
- Dropdown Field – Allows users to select from predefined options instead of manually entering data. This ensures consistency, speeds up invoice creation, and reduces errors in commonly used fields.
- Example: Carrier, Transporter
Way to add dropdown options
- If you select a dropdown, you must also add options that will be available for selection when creating a new invoice.
- Commas separate multiple options in a dropdown, as shown in the image below.

Step 7: Configure Field Settings
In this step, customize how the field behaves in invoices by configuring the following settings:
- Status – Choose whether the field should be active or inactive. An active status makes the field available for use, while an inactive status hides it from forms and records.
- Print – Determine if this field should appear on printed invoices or reports. Enabling this option ensures the field’s data is included in physical and PDF copies.
- Required – Mark the field as mandatory if it must be completed by users. This ensures critical information is always captured and prevents incomplete entries.
- Actions – The Actions column includes delete button that allow users to remove unnecessary custom fields. The button helps eliminate fields that are no longer required.

Step 8: Add More New Fields (Optional)
- If needed, you can add multiple custom fields by repeating the process. This allows for greater flexibility in capturing additional business-specific information.
- We have added two more fields, as shown in the screenshot below, to enhance invoice customization and ensure that all necessary details are recorded efficiently.
- Example: Carrier Name, Vehicle Type

Step 9: Save Changes
- Click the Save button to apply the new custom field settings. This ensures all modifications are stored and reflected in the system.

Step 10: Use Custom Fields While Creating an Invoice
- In this step, the custom fields you configured earlier appear on the new invoice form. These fields allow you to capture additional details, such as Vehicle Number, Carrier Name, and Vehicle Type, directly within the invoice.
- During invoice creation, the custom fields added in previous steps enable you to enter and manage additional details seamlessly.

Preview and Download Invoice
After creating an invoice with custom fields, you can:
- Preview the invoice – Review how the custom fields appear in the final layout.
- Download as PDF – Save the invoice as a PDF for printing, sharing, or record-keeping.

Conclusion
Creating custom fields in KhataBuddy allows businesses to personalize their invoicing system, ensuring more efficient data management and improved workflow. By following the steps outlined above, you can easily tailor your records to match your unique business requirements.
